In case your knowledge heart makes use of Linux machines, one of many administrative duties you’ll wish to undertake is usually checking the well being of the SSD drives used on these machines. Why? As a result of, despite the fact that strong state drives will dramatically outlast rotating platter drives, they do have a finite lifespan. The very last thing you wish to do is fall sufferer to that individual finish of days.
How do you verify the well being of these drives? As with the whole lot in Linux, there are alternatives. Though a GUI answer exists (GNOME Disks), I extremely advocate going with a command line device for this process. Why? More often than not, your Linux servers gained’t embody a GUI; with the command line, you possibly can simply make use of it by securely shelling into your distant Linux server and working your exams from the terminal.
The device in query is smartctl. With this command, you possibly can shortly glimpse your SSD well being. In fact, how a lot mileage you get from the command will rely upon the make/mannequin of SSD you utilize. Sadly, the S.M.A.R.T. (Self-Monitoring, Evaluation, and Reporting Know-how) instruments aren’t at all times updated with each SSD drive.
Due to this, you can’t be sure of the variety of occasions your SSD chips have been written to. Even with that in thoughts, you may get a very good estimate of the wear and tear and tear in your drives.
Let’s set up and use smartctl.
SEE: The right way to View Your SSH Keys in Linux, macOS, and Home windows (TechRepublic)
Set up
I will probably be demonstrating with the Ubuntu platform. The required package deal is discovered on all the usual repositories, so regulate the set up command to suit your specific distribution of selection.
The smartctl utility is part of the smartmontools package deal. This may be put in with a single command:
sudo apt set up smartmontools
Do be aware, the above command will even set up libgsasl7, libkyotocabinet16v5, libmailutils5, libntlm0, mailutils, mailutils-common, and postfix.
As soon as the package deal is put in, you’re able to go.
SEE: Securing Linux Coverage (TechRepublic Premium)
Utilization
To make use of the smartctl device, the very first thing you’ll want to do is collect details about the drive, which is finished by way of the command:
sudo smartctl -i /dev/sdX
The place sdX is the title of the drive to be examined.
The above command will print out the main points related together with your drive.
As you possibly can see, the drive in query is within the smartctl database, so data must be up-to-date.
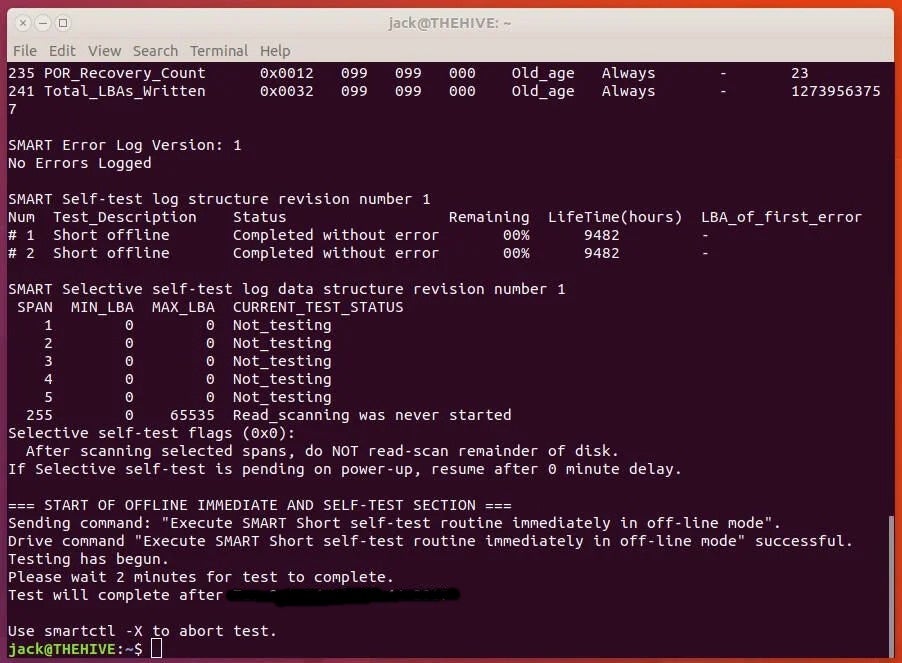
Let’s run a brief check on the drive. These exams will really provide the most correct knowledge in your drive (so it’s necessary to make use of these included instruments). Challenge the command:
sudo smartctl -t brief -a /dev/sdX
This may instantly report some bits of data.
I like to recommend you run a brief and a protracted check weekly or (month-to-month) in your drives. To run a protracted check, the command is:
sudo smartctl -t lengthy -a /dev/sdX
One of many first issues it is best to see is the outcomes of the SMART total well being self-assessment check. That ought to say PASSED. If not, you recognize, instantly there’s one thing flawed together with your SSD.
The brief check will study the next:
- Electrical properties: The controller exams its personal electronics, which differs for every producer.
- Mechanical properties: Servos and positioning mechanisms are examined (additionally particular to every producer).
- Learn/confirm: A sure disk space will probably be learn to confirm sure knowledge (the scale and place of the area learn is exclusive to every producer).
The lengthy check runs the whole lot included with the brief check, whereas including:
- No time restriction and within the learn/confirm section.
- The whole disk is checked (versus only a part).
The brief check takes roughly two minutes to finish, whereas the lengthy check would require between 20-60 minutes (relying upon your {hardware}). To view the outcomes of the check, challenge the command sudo smartctl -a /dev/sdX (The place sdX is the title of the drive examined).
The command will print out the check outcomes and all the data it is advisable to confirm the well being of your SSD.
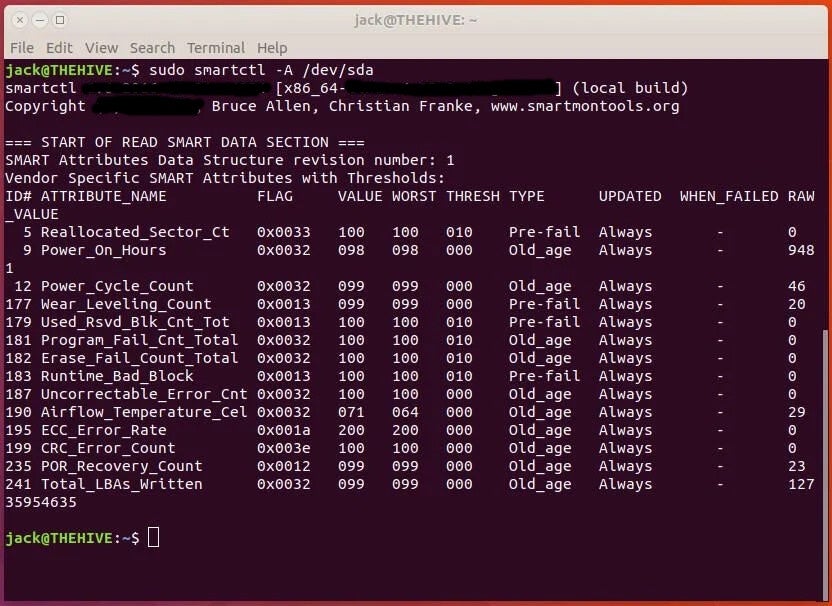
Past the self-test log, there are two values within the output to be examined:
- Power_On_Hours — what number of hours the drive has been powered on. Every make/mannequin of drive has a really helpful “shelf life” of hours it may be used. Most fashionable SSDs have pretty unbelievable lifespans, so likelihood is you’re not going to stumble upon the top of life. In the event you’re utilizing an older drive, this may be a difficulty.
- Wear_Leveling_Count — Stands for the remaining endurance of the drive in share (ranging from 100 and reducing linearly because the drive is written to).
You will need to have a look at the worth and worst worth columns. As you possibly can see, my Samsung SSD is presently at a 99 for Wear_Leveling_Count, which is a really wholesome drive.
One factor to remember is that totally different producers will report totally different knowledge with smartctl. For instance, I’ve an older Intel and Kingston SSD drives hooked up to the identical machine. Each of those drives report related (and extra complete) knowledge. Nevertheless, neither report the Wear_Leveling_Count. Why? These are each older drives and don’t report ID 177 (Wear_Leveling_Count). As an alternative, your finest wager is to run each the brief and lengthy exams and confirm the well being of your drives by way of these reviews.
SEE: The right way to Hook up with Linux Samba Shares from Home windows (TechRepublic)
The plain caveats
There are two caveats with smartctl.
First off, it’s straightforward to misread the reported knowledge. Due to this, you need to know the make and mannequin of the drive you’re testing. Upon getting that data in hand, you possibly can analysis any anomalies with reported knowledge.
Second, it’s essential to utilize the testing instruments. Though you possibly can run a command like smartctl -A /dev/sdX, you don’t get the additional advantage of the testing outcomes. Make certain to usually run the brief and lengthy exams, to get essentially the most up-to-date data in your SSD drives as you possibly can.
This text was initially printed in October 2017. It was up to date by Antony Peyton in December 2024 so as to add new hyperlinks and pictures.